
Hey guys,
I was looking through the different Arduino boards trying to figure out which one to use as the brains of the Adalight system I am setting up. I have an Uno that I can use, but I think going with something smaller makes more sense. My first thought was the Pro Mini (being the smallest out there) but that was quickly squashed because it uses an FTDI header instead of USB. Trinket was squashed because it's just too small. Next thought was using an Arduino Micro. It's small, che@p, and seems to be up to the task.
My question is in the wiring; the yellow wire obviously goes to the dedicated MOSI pin, and the green goes to the SCK pin right? I got that by comparing the UNO pinout descriptions to the Micro pinout, but please correct me if I am mistaken.
Thanks in advance for helping a noob understand!
Using Arduino Micro with Adalight
Moderators: adafruit_support_bill, adafruit
Please be positive and constructive with your questions and comments.
-
adafruit_support_mike
- Posts: 67485
- Joined: Thu Feb 11, 2010 2:51 pm

Re: Using Arduino Micro with Adalight
The pins in question really aren't MOSI and SCK by the hardware definition.
The LED strip used in the Adalight project is pretty easy to get along with in terms of communication. It has a DATA line and a CLOCK line, and all it really needs is the correct pattern of pulses on those two lines. The protocol isn't SPI or I2C, but it falls in the same general category of clocked-data protocols.
That's a good thing in this case. The Arduino Micro is basically a small form factor version of the Leonardo, using the ATmega32U4 (which handles its own USB communication) instead of the Uno's ATmega238P. The hardware SPI and I2C pins are arranged differently on those two chips, and on the two flavors of Arduino, but thankfully that isn't relevant here.
In this case, all you really need to know is:
- pin 11 -> yellow wire / CLOCK
- pin 13 -> green wire / DATA
- GND -> blue wire / GND
-
solongsidekick
- Posts: 34
- Joined: Sun Dec 22, 2013 5:26 pm
Re: Using Arduino Micro with Adalight
Oh, so it is the exact same wire setup as the UNO? That is interesting, and good to know!
Thanks a bunch!
Thanks a bunch!
-
solongsidekick
- Posts: 34
- Joined: Sun Dec 22, 2013 5:26 pm
Re: Using Arduino Micro with Adalight
Wait I actually jumped the gun when saying I understood. Which pins are 11 and 13? The pinout for the ATmega32 says pin 13 is the reset pin, so it's obviously not the chip pin 11 and 13. And the actual board doesn't define pins 11 and 13. There are a D11 and D13, but I don't think that's what you were talking about.
This is the image I am looking at:
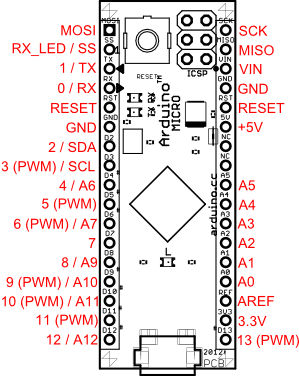
This is the image I am looking at:
-
jigsawnz
- Posts: 180
- Joined: Mon Mar 12, 2012 10:17 pm

Re: Using Arduino Micro with Adalight
Hello,
I use a teensy 2.0 to run my adalight setup. It's a pretty small package.
I use a teensy 2.0 to run my adalight setup. It's a pretty small package.
-
adafruit_support_mike
- Posts: 67485
- Joined: Thu Feb 11, 2010 2:51 pm
Re: Using Arduino Micro with Adalight
D11 and D13 are the ones you want.
Don't worry about the chip's pinout or the alternate functions. If your code says:
it will blink the pin labeled '13' or 'D13' at the edge of the board. That's all the Ambilight code wants to know.
Don't worry about the chip's pinout or the alternate functions. If your code says:
Code: Select all
while (1) {
    digitalWrite( 13, ~digitalRead( 13 ) );
    delay( 250 );
}
-
pburgess
- Posts: 4161
- Joined: Sun Oct 26, 2008 2:29 am

Re: Using Arduino Micro with Adalight
Adalight uses hardware SPI; therefore you want MOSI (data) and SCK (clock).
For the Arduino Micro, I think the status LED settings would be:
(Assuming the PORT-to-pin mapping is the same as the Leonardo; haven't confirmed this.)
For the Arduino Micro, I think the status LED settings would be:
Code: Select all
#define LED_DDR  DDRC
#define LED_PORT PORTC
#define LED_PIN _BV(PORTC7)-
adafruit_support_mike
- Posts: 67485
- Joined: Thu Feb 11, 2010 2:51 pm
Re: Using Arduino Micro with Adalight
Whoops..
Listen to Phil.. he wrote the code.
Listen to Phil.. he wrote the code.
-
solongsidekick
- Posts: 34
- Joined: Sun Dec 22, 2013 5:26 pm
Re: Using Arduino Micro with Adalight
Holy hell, my first guess was right. I'll chalk that up as a win for my extremely basic Arduino knowledge haha. Thanks a ton guys!
So do I need to make the above changes to the code in the Arduino IDE?
So do I need to make the above changes to the code in the Arduino IDE?
-
pburgess
- Posts: 4161
- Joined: Sun Oct 26, 2008 2:29 am
Re: Using Arduino Micro with Adalight
The three lines of code are just for the status LED on the board (blinks each time data is received)...not critical to the operation of Adalight, just useful for debugging.
Otherwise, no code changes are needed; the original Adalight sketch should work fine, you just need to change the wiring to connect to those two pins on the board (instead of 11 and 13) for data and clock.
Otherwise, no code changes are needed; the original Adalight sketch should work fine, you just need to change the wiring to connect to those two pins on the board (instead of 11 and 13) for data and clock.
-
solongsidekick
- Posts: 34
- Joined: Sun Dec 22, 2013 5:26 pm
Re: Using Arduino Micro with Adalight
Ah I see, thanks for helping me understand; I really appreciate it!
-
Ratchoum
- Posts: 1
- Joined: Fri Mar 06, 2015 6:44 am

Re: Using Arduino Micro with Adalight
Hi guys,
I would like to setup an adalight too but I don't know what to choose between trinket and pro trinket. I guess my question is, can I use trinket for adalight or do I have to go with pro trinket?
Thanks in advance for helping an electronics vergin
I would like to setup an adalight too but I don't know what to choose between trinket and pro trinket. I guess my question is, can I use trinket for adalight or do I have to go with pro trinket?
Thanks in advance for helping an electronics vergin
-
buby
- Posts: 1
- Joined: Mon Jul 20, 2015 1:46 pm

Re: Using Arduino Micro with Adalight
Sorry for silly question but i still not understand how to wire the arduino micro to the led strip :( :( ... i put white and red cable on gnd and +5 but the green i dont understand to which pin i should attach :( sorry for silly question
ok reading better i saw which the turotial is amde for the strip which have 4 line, data clock and power supply +/- ..my strip ahve jsut 3 wires :) .... my research continue :) if i will find solution i will write
ok reading better i saw which the turotial is amde for the strip which have 4 line, data clock and power supply +/- ..my strip ahve jsut 3 wires :) .... my research continue :) if i will find solution i will write
Please be positive and constructive with your questions and comments.